
The listing photos for a rental property are the most important part of the listing. Oftentimes, many potential applicants don’t even read the listing description. They just simply skim through the photos and decide right then and there whether they are interested or not.
The problem is that vacant units cost a lot of money – between cleaning, repairs, and no rent coming in – so the last thing most landlords want to do is shell out $200-$300 more for professional photography.
Luckily, with a few small pointers, you can take high-quality real estate photos with your smartphone.
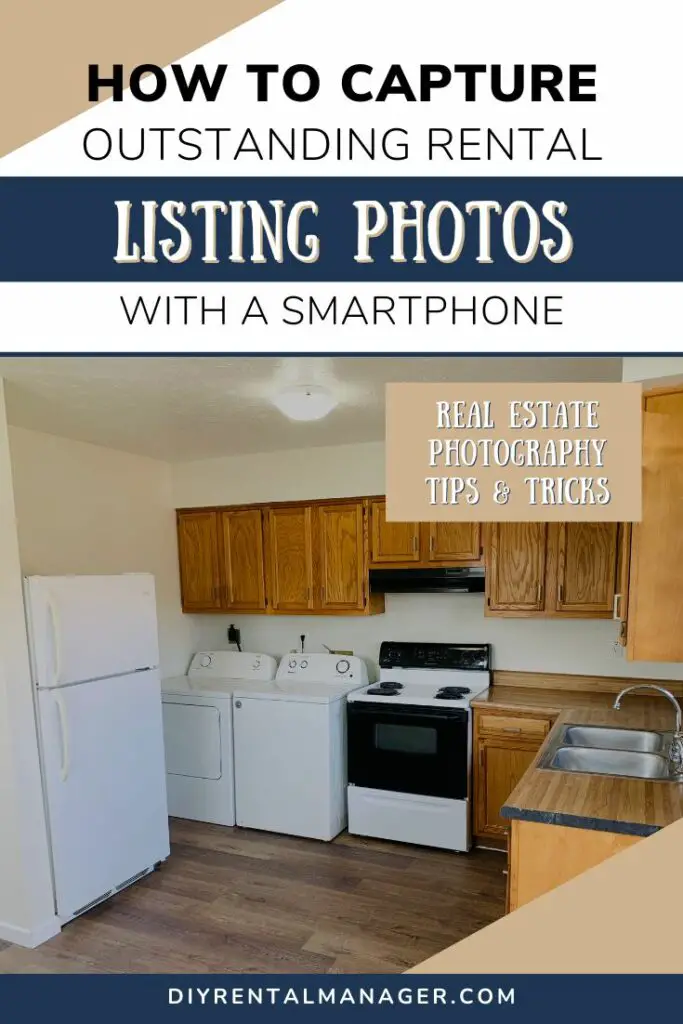
To take high-quality rental listing photos with a smartphone, turn on all lights and open all blinds. Take pictures in the late afternoon, from each corner of the room, and of important features of the inside and outside of the home. The 20 best images should be edited with a bright or vivid filter on your phone.
With those main points in mind, I’ll cover everything you need to know to take high-quality real estate photos with your phone and save that $200-$300 below.
Let’s dive in!
Quick Navigation
- Benefits Of High-Quality Rental Listing Photos
- Equipment & Preparation Needed Prior To Taking Rental Listing Photos
- Take Rental Listing Photos At The Right Time Of Day
- Turn On All Lights & Open All Blinds/Curtains Before Taking Rental Listing Photos
- Hold Your Phone At The Right Height While Taking Rental Listing Photos
- Take Photos From Each Corner Of The Room/Exterior Of The Property
- Take Photos Of Any Key Features Within The Room/Outside The Home
- Edit The Photos Before Using Them For A Rental Listing
- Final Thoughts
- Related Content
1. Benefits Of High-Quality Rental Listing Photos
The photos within your listing are what is going to help you get the most qualified applicants (which should get you a great tenant). As we discussed above, most potential renters don’t read the listing description unless they like what they see in the listing photos.
So it is crucial to create high-quality, detailed photos which will help your listing get more views (and therefore, more applications).
Showcasing multiple, high-quality photos also helps enhance the professionalism of your property. If you share 20+ photos then it helps the potential renters feel like you aren’t trying to hide anything. When these potential renters arrive at a showing, they should not be surprised by anything because the photos should have showcased everything exactly as they will see it when they visit.
Luckily, you can easily display the highlights of your home, increase inquiries, and potentially fill your rental unit faster with a few small tweaks to how you take listing photos.
2. Equipment & Preparation Needed Prior To Taking Rental Listing Photos
All you need to take professional-looking rental listing photos is a smartphone with a good digital camera. If you have a high-quality camera, that could also enhance the quality of the photos. But for most self-managing landlords such as myself, your smartphone will be plenty good.
Before we take any photos, we always repair/update, paint, and deep clean the home. The home should be move-in ready before you take any photos.
The nice thing about taking photos of an empty unit is that the next time you are about to have a vacancy, you can use these same photos to list the property early before the existing tenant moves out to start getting some interest in your listing and minimize the time the property sits vacant.
(This re-use of photos works best once you have a standard paint color and type of flooring throughout all of your rentals. That way, even if you have to replace, update, or paint anything, the pictures will look the same.)
Once the home is move-in ready, it’s time to take some pictures.
3. Take Rental Listing Photos At The Right Time Of Day
The time of day makes a world of difference in how your listing photos will turn out. The best days to take interior photos are on overcast or sunny days, and the best days to take exterior photos are on overcast days.
Cloudy/overcast days remove any shadows from your photos, so you can get a better picture of the exterior of the home. If the day is sunny and you still want to take photos of the property, then wait until later afternoon (around 4-5 PM) when the sun isn’t as harsh and won’t cast as many shadows or glares across the photos.
The easiest way to get great pictures is to try and take a great photo before you edit it (then enhance it a little bit to make it an outstanding photo). You can only edit a picture so much until it looks fake and unprofessional. So really focus on getting the angles and lighting right from the get-go, so the editing can be minimal later on.
We typically wrap up a unit turnover around 4 or 5 PM on a Saturday or Sunday (because we are mostly Weekend Warriors since we also have full-time jobs), so around that type is when I take photos. So far, they’ve turned out pretty great!
What To Avoid:
- Rainy days
- Late evening/dark nights (unless you are trying to showcase decorative exterior lighting)
- The brightest point of a sunny day
4. Turn On All Lights & Open All Blinds/Curtains Before Taking Rental Listing Photos
Now that you are at the property at the right time of day, it’s time to increase the level of light inside the home.
To get better quality, bright photos:
- Turn on all interior lights
- Open all blinds and curtains
Natural light from outside is the best kind of light for rental property listing photos. The natural light creates a bright and airy look to the room within the picture, and it is the easiest lighting to edit and enhance later on.
In addition, daylight lightbulbs inside the home also create better photos because they mimic natural light. The soft white lightbulbs often make listing pictures look yellow and dingy. No matter how pretty and modern your property looks, these lights will always make it look a little more yellow in pictures.
However, if you have soft white lightbulbs in your rental already (such as in the bedrooms), don’t worry about this too much because the natural light from outside will reduce the amount of yellow they put into the room.
We often put soft white lightbulbs in the bedrooms, so I never worry about changing them before taking photos. I just make sure to let in as much natural light as possible so I can get higher-quality photos of the home.
What To Avoid:
- Lights off
- Closed blinds or curtains
- Anything else that will make the room appear dark and dingy
How Do You Light A Room For Rental Property Photography?
The best way to light a room for rental property photography is to use natural light from the outside. Open up all of the blinds and curtains to let in the most amount of light. Also turning on all of the interior lights helps to prepare a room for real estate photography.
5. Hold Your Phone At The Right Height While Taking Rental Listing Photos
Another small thing you can do to enhance the quality of your listing photos is to take pictures from 5 feet above the ground.
Taking listing photos from 5-6 feet above the ground gives a natural angle that the average person will actually view the room. Anything lower will make the room seem small and highlight odd angles of the room that shouldn’t be regularly seen. And anything much higher than 6 ft also gives odd and unnatural angles of the room for the viewer.
When I take photos of our rentals, I typically hold my phone up by my eyes (I’m 5′ 6″) and that lets me get a natural angle of the whole room.
What To Avoid:
- Holding the phone at your chest or lower makes the room seem small
- Holding the phone near the ceiling makes it seem like you’re viewing the room from a security camera
What Height Should You Take Rental Listing Photos?
The best height to take rental listing photos is around 5-6 feet above the ground. This is the most natural height that most people actually view a room, so it will provide the most realistic view of the home for the viewer.
6. Take Photos From Each Corner Of The Room/Exterior Of The Property
The best way to showcase all angles of a room as realistically as possible (without taking 100 pictures) is to take a photo from each corner of the room and from each corner of the exterior of the property.
Also, hold the phone in landscape view to get the widest angle of the room. If you have a wide-angle lens for your phone, then that could make the photos turn out even better. That’s a personal preference though. I don’t have a wide-angle lens on my phone, and our listing photos turn out fine.
To get the most useful and detailed photos of the rental, start at the entrance and take pictures in the order that you’d walk the property. The general order we take photos is:
- Front of building
- Front door (if you can’t see it in the front of the building photo)
- Front entrance
- Living room
- Kitchen
- Hallway
- Bathroom
- Bedroom 1
- Bedroom 2
- Laundry/utility room
- Basement (if applicable)
- Patio/yard/back of the property
- Parking/garage
This is also the order in that I try to upload the photos onto the listing because it helps the potential applicant understand the flow of the property. The more information we can showcase in the photos upfront, the easier it will be to fill the home because there should be nothing unexpected.
Remember to take a picture from each corner of all of the rooms listed above. You will end up with 2-4 pictures of each room and the exterior of the property at the end of this exercise.
What To Avoid:
- Taking too few pictures of each room
- Forgetting some rooms
- Getting too close of pictures of the room (the corners give you the best angles)
What Angles Should You Take Pictures Of A Rental Property For A Listing?
The best angle to take rental listing photos is from each corner of the room. This will give the widest view of each side of the room and provide the most realistic view of the home for the viewer.
7. Take Photos Of Any Key Features Within The Room/Outside The Home
Also as you walk each room (or after you go through each room and take the 4-corner photos), take photos of the key features in the room (if they aren’t obvious in your main photos).
Since potential renters do use the photos as the main way to get info about the property, the photos need to showcase anything important such as:
- Washer and dryer hookups
- Closet space
- Any appliances included (especially if there’s a dishwasher)
- Extra parking
- Outdoor/entertaining spaces
- Garage space
- Extra space that your home has that others don’t
- Any shared space (such as shared stairs, a shared basement, etc)
Adding photos specifically of these extra features will help your listing get more engagement because the renters will be able to quickly and easily see if you provide the amenities they want or not.
We always include pictures of the closet space and pictures of the washer and dryer hookups to help potential applicants see our homes have those amenities.
At this point, you probably have 30-40 photos that are ready to be edited!
What To Avoid:
- Taking duplicates of features
- Forgetting some features
- Taking too few pictures to the point where the potential applicant feels like you are hiding something
8. Edit The Photos Before Using Them For A Rental Listing
Finally, it’s time to edit the photos so we can publish them on a listing. If you did all of the steps prior to this one, then this should be the easiest part.
My favorite way to edit listing photos is to use the built-in filters on my iPhone (Android probably has similar filters or you can find a photo editing app that will let you do this as well). Using one of the built-in filters helps me to get a uniform look across all of the photos, which in turn, helps the photos appear more professional.
To edit the photos on an iPhone:
- Open up the photo on your phone
- Click the Edit button in the top right corner
- Click on the 3 overlapping circles button in the bottom middle
- Select the Vivid filter (for iPhones – any filter that increases the brightness, contrast, and saturation of the photo will work, or you can do this manually)
- Click done
- Repeat for all photos
This is the best filter I’ve found that really enhances the colors and brightness of the photos (especially if you have a lot of natural light in the photo). It also gives the most natural and realistic representation of the property.
To edit the photos on an Android phone, check out these instructions.
That’s it! Then I take those edited photos and upload them to whatever listing site I am using at the time. Check out my other article for our full unit turnover process that will help you find great tenants.
As an added bonus, you could use the free editing tool at Canva.com to create a graphic that displays the rent amount, security deposit amount, lease term, and any other important features that the listing description includes. Again, the more interest you can capture in the photos, the more inquiries and applications you will receive.
After you have all of the photos edited, be sure to upload them to a Google Drive that contains all of your other important documents, so you always have access to them. To see how we organize all of the documents we gather from our tenants on Google Drive, check out my other article here. [COMING SOON]
What To Avoid:
- Using fake-looking filters (such as dark filters, black and white filters, too-bright filters, or anything that doesn’t look natural)
- Taking too much time doing this (you could spend hours editing the photos – my goal is to reach “That looks good!” as quickly as possible)
How Do You Make Rental Property Listing Photos Pop?
The best way to make rental property listing photos pop is to take photos with natural lighting and use a filter that increases the brightness, saturation, and contrast of the photos. Built-in vivid filters on phones often accomplish this and make the photo look natural while adding a little pop.
Should You Watermark Rental Listing Photos?
Watermarking rental listing photos is a great way to prevent scammers from using your photos to create a fake rental listing and steal money from potential renters. To add a watermark to your listing photos, you can use Canva.com.
Final Thoughts
Every time we have a rental property that needs new listing photos, we follow this exact list to create professional-looking listing photos ourselves.
We’ve found that by taking time to make the pictures look great, we get a lot more engagement on our listing than other properties do. This ultimately helps us find better tenants.
I hope you find this article useful and that it helps you save some money on your rental listing photos!
Catch you in my next post!
Related Content
Check out my recommended tools, templates, and resources to free up your time from constantly working on and worrying about your rental properties. My husband and I use these tools to self-manage 18 rental units (and counting) for only 5-10 hours a month.
Keep in mind that most of these items are either free or reasonably priced for the amount of value that they provide. My goal on this page is to recommend tools, templates, and resources that we use daily and wish we had known about at the beginning of our landlord journey. Since implementing them, they’ve saved us countless hours and tons of headaches.
Finding good tenants for a rental property is arguably one of the most essential tasks that a self-managing landlord must accomplish. You’re searching for a high-quality tenant that will pay on time, take care of the property, and be easy to communicate with all while trying to get the most amount of rent and filling the vacant unit as quickly as possible.
That’s no small feat! So, how can you find good tenants for your rental property?
By Christine
Christine is a blogger and real estate investor/property manager who self-manages 18 rental units (and counting) alongside her husband, Adam. Although she successfully automates the management of her rentals and pockets the property management fee now, her path to success was not easy.
Go here to read her story, “From An Overwhelmed First-Time Landlord To A Pro Investor Self-Managing 18 Rentals On Less Than 10 Hours Per Month“.
Recent Posts

How To Reject A Tenant Application (With Examples!)
When you start to accept applications for your rental property, you’ll inevitably get some applications that do not meet your minimum screening standards (even if you list them in the listing, some people just don’t read or don’t care). When this happens, you’ll have to carefully review the application and send back a Tenant Application…

How To Write A New Tenant Welcome Letter For Your Rental Property
When we have found a new tenant that we are ready to sign a lease with, we want to start the new relationship off on the best terms possible. In order to do that, we need to ensure that they are familiar with the most important details of the lease. We do this by providing…
Ultimate Guide To Collecting Rent And Charging Late Fees As A Landlord (Easy System!)
Collecting rent from tenants is one of the most time-consuming (and emotionally charged) parts of being a landlord. Not only will you get every excuse under the sun about why rent will be late this month (again), but you will also miss out on opportunities to collect extra income and increase rent over time if…